Get Grilling with Tasty Recipes and Helpful Hints

Grill

Summer’s almost here and that means we’ll be grilling like crazy. After all, the backyard barbecue is not only an easy and popular way to cook and entertain this time of year, everything just tastes better when it’s fresh off the grill — burgers, brats, ribs, steak, pork, poultry, seafood, potatoes, vegetables, even fruit!

Self-proclaimed grill masters like my husband will tell you that it takes time, practice and a little trial and error to prepare the perfect medium-rare rib eye or lightly charred chicken. But, having the right tools and info upfront will help you hone your barbecuing skills and avoid potential disasters, like setting your garage on fire or under-cooking your entree.

Since I’m not an expert on the subject (nor admittedly is my husband), I’ve included a few web links for grilling guidelines, recipes, resources, and more.

kingsford.com — sponsored by Kingsford (the only brand of charcoal we’ll use), this site offers an impressive collection of recipes, ideas and techniques from professional outdoor chefs.

best-grilling-tips-and-recipes.com — the folks behind this site searched high and low to compile some of the greatest outdoor grilling recipes and tips available online.

BBQGuys.com — in addition to being an excellent online resource for quality grills, smokers and grilling tools, these guys provide insights, articles, instructional videos, and loads of inspiration to help you become a master griller.

And now for some enticing recipes…

raw salmon filet

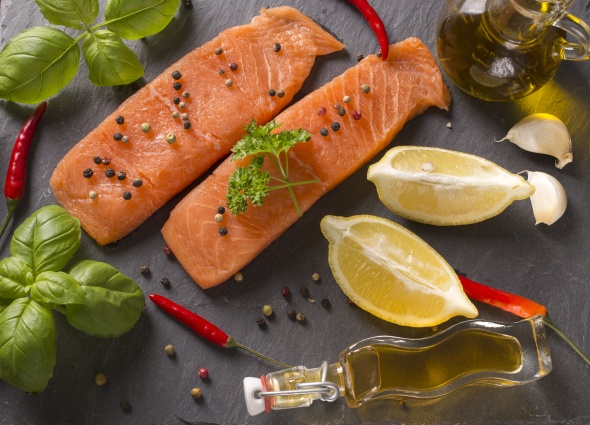
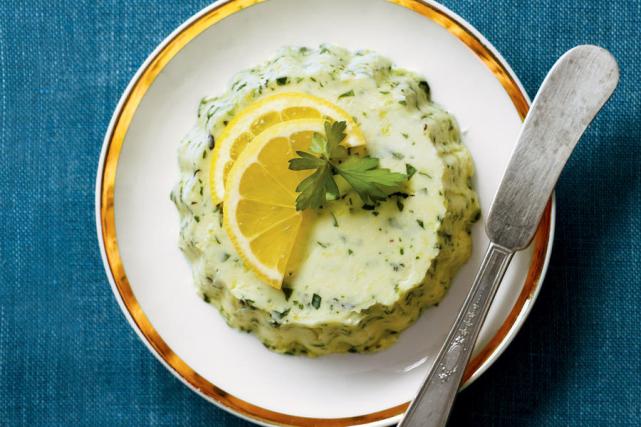
Make your salmon more savory with select herbs, lemon, olive oil and garlic – I get requests for this recipe all the time!

Herb-Crusted Salmon
Ingredients:
Four fresh or frozen salmon fillets (skin-on), 3/4″ thick
1/3 cup chopped fresh oregano
1/3 cup chopped fresh cilantro
1/4 cup sliced green onions
1 clove garlic, minced
1 tbsp. fresh lemon juice
2 tsp. olive oil
1/4 tsp. salt
1/8 tsp. pepper

Directions: Thaw salmon fillets, if frozen. Rinse and pat dry with paper towels. Combine oregano, cilantro, green onion, garlic, lemon juice, oil, salt and pepper in food processor or blender. Cover and process until chopped. (Or, use a knife to finely chop oregano, cilantro, green onion and garlic. Transfer to a shallow bowl, then stir in lemon juice, oil, salt and pepper.) Generously coat both sides of salmon with herb mixture. Place salmon, skin-side-down, on clean, lightly oiled grill rack directly over medium-hot coals or preheated gas grill. Cook until salmon is brown on the outside and flakes easily with a fork (about 6-8 minutes per side), turning fish once halfway through grilling. If there’s any skin left on the salmon after grilling, remove it before serving.
Need help grilling salmon? Click here for tips.
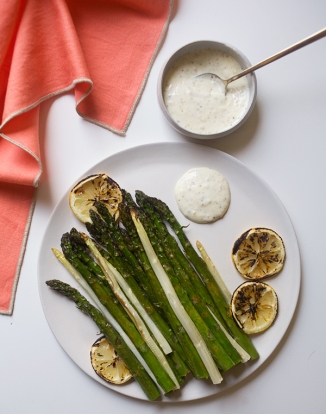
Grilled Asparagus

grilled asparagus

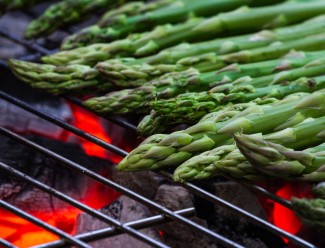
You may not be a fan of the green spears, but you will be after sampling these!

Ingredients:
1 lb. fresh asparagus spears
1 tbsp. extra-virgin olive oil
3 tbsp. balsamic vinegar
Sea salt
Cracked black pepper

Directions: Snap off tough (woody) ends of asparagus. Lightly season with salt and pepper and place in a shallow bowl. Cover with olive oil and balsamic vinegar. Marinate for 1 hour, turning asparagus frequently. Preheat grill and place asparagus spears on clean, lightly oiled grill rack. Cook 4-5 minutes on each side until asparagus is tender with a fork. Turn often so they brown on all sides. Remove from grill and serve immediately. Yields 4 servings. Variation: Omit the vinegar and sprinkle asparagus with lemon juice and Parmesan cheese.

Pineapple Chicken Kabobs

Grilled chicken with pineapple

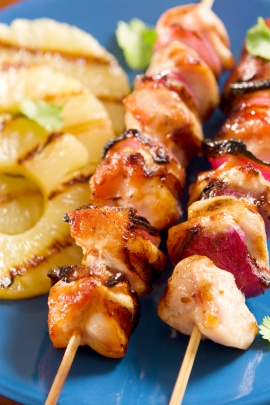
Looking for something different to do with chicken, I found this recipe from Mum’s the Word on Yummly.

Ingredients:
1 lb. chicken breasts cut up into large bite sized (approx. 1″) chunks
1 fresh ripe pineapple (canned is okay, but fresh is better), cut into bite sized chunks
1 red onion, sliced into 1″ pieces
1 tsp garlic powder
1 Tbsp. brown sugar
1/2 tsp. ground ginger
1/2 tsp. black pepper
1 Tbsp. oil (vegetable or canola)
2 Tbsp. water
1/4 cup low sodium soy sauce

Directions: In a medium sized bowl, combine garlic powder, brown sugar, ground ginger, black pepper, oil, water & soy sauce. Whisk vigorously for 1 minute until combined. Add chicken and mix until chicken is coated with sauce. Dump entire contents into a gallon sized zip lock bag (or cover bowl with saran wrap) and marinate in  refrigerator for 3-4 hours, mixing contents of bag/bowl every hour to ensure even marinade. Place wooden skewers in a pan of water and allow them to absorb the water while chicken is marinating. When chicken is done marinating, alternately skewer pineapple, onions and chicken until skewers are full, leaving 2″ on each end. Spray grill with a non-stick spray and place skewers on grill rack. Cook for 10-15 minutes or until chicken is done, rotating every 5 minutes to ensure even grilling. Serve immediately over rice. NOTE: I add extra raw veggies like bell peppers (cut into chunks) and cherry tomatoes.

Steak Marinade
Ingredients:
1/2 cup soy sauce
1/2 cup olive oil
2-3 cloves garlic, minced
3 tbsp. red wine vinegar
Dash of fresh pepper

Directions: Mix ingredients together in a bowl. Place marinade in a large freezer bag with steak, coating steak completely. Seal bag and refrigerate for 8-12 hours or overnight. Discard marinade and grill steak to desired doneness.

Make your own wood chips to infuse grilled food with a delightful wood-smoke flavor
We’ve always enjoyed that smoky, barbecue-y flavor you get from grilling with charcoal and my husband found a way to enhance it. Whenever he prunes/trims our apple trees, he cuts the trimmed branches into thumb-size (about 1″) chunks. Leaving the barks on, he lets the wood chunks dry for a couple of weeks then places several directly in with the charcoal briquettes. (Experts recommend soaking wood chips in water for a few minutes first for a slower burn.) Of course you can always get wood chips from the store, but why buy ’em if you don’t have to!  Click here for ways to use wood chips on gas grills. 

Here’s to a fun and flavorful Memorial Day weekend!

SAVE 78% on steak, chicken, burgers and more for grilling with this deal from Omaha Steaks – use promo code 44644KXS at check out to get your discount. 

Smart Perks Blogger Catherine B. loves just about anything from the  grill and the fact that someone else does the cooking for a change.

Planting Herbs: A Feast for the Senses

MainHerbImage_DSC01724_ALT

If the thought of a garden nursery or farmer’s market makes your pulse quicken, then you’re probably familiar with the intoxicating allure of the herb. Even if I never once used my herbs for cooking, I would still plant them every year, because they are literally a feast for the senses, their heavenly aromas released with a touch, stunning colors and foliage, wonderful variety of textures, and oh, the taste of fresh versus dried herbs! C’est magnifique!

Martha Stewart & the British pronounce them with a Her rather than a Ur, which always makes me laugh because I think of my Great Uncle Herbie and the 70s classic Herbie “The Love Bug”.  But I digress.

Before I plant my window boxes or garden, I plant herb bowls. I can plant them early in the season, and if the temps are going to fall too low, I can easily bring them indoors or cover them to protect against frost damage. Basil is especially susceptible to damage from the cold weather, and should not be planted outdoors until all danger of frost has passed.

Another reason I love herb bowls is because I can get creative with mixing and matching complementary plants for simple aesthetics. My favorite pot would contain a variety of different colors and textures. For instance, thyme is one of my all-time favorite herbs for container gardening, because it comes in so many beautiful varieties. I love the tiny green teardrop leaves on woody stocks. My favorite thyme plants are English Thyme, Woolly Time, a wonderful fuzzy creeper, and Lemon Thyme, with its gorgeous variegated foliage and fresh citrus scent.

5Plants_DSC01736_ALT

Clockwise: Pesto basil, lemon thyme, english thyme, rosemary and french lavender

A good rule of thumb when planting for aesthetics is to plant one tall plant such as a silvery rosemary or chives, a trailing plant like creeping Rosemary, a small to medium-sized colorful plant, like a purple sage or purple basil, a bright lime green plant thyme, and a specialty variety oregano.

Or, I can plant for a more utilitarian theme, like a bowl containing the most common herbs for cooking (basil, oregano, sage, chives and thyme or rosemary), or, for sweets, teas, soaps and oils (chamomile, lemon verbena, mints and lavender).

4Plants_DSC01730_ALT

Clockwise: Peppermint, purple basil, woolly thyme, and golden sage

When I say mint, you probably think peppermint. But there is quite a variety of mints to choose from, including pineapple or chocolate. My favorite cheap thrill of summertime is to pluck a fragrant leaf or two of pineapple mint and just inhale the deliciousness.  A word of caution, though: mint is best grown in pots as it is an aggressive grower, and will quickly take over a garden, spreading year after year.

Watering – Unlike house plants, herbs need to be watered frequently. The good news is unless left for several days without water, most herbs will bounce back from wilting once watered. During hot summer days, you may have to water at least once a day. They should never be allowed to dry out, completely.

Clipping & Pruning – Using basil as an example, when clipping, start towards the top. That’s where the tender, young leaves are. The large, older leaves at the bottom of the plant absorb the energy from the sun that helps produce new leaves. With basil, and other herbs, you should never allow them to flower unless you’re growing them for decorative purposes only. All of the plant’s energy goes to the flower instead of producing new leaves. You want your basil growing out, not up.

Storing Fresh Herbs – Most cut fresh herbs will keep for at least a week, wrapped in a damp paper towel and stored in a sealed plastic bag in the refrigerator.

Cooking  – One tablespoon of chopped fresh herbs will equal approximately one teaspoon of dried herbs. Or you can simply remember you’ll typically need 3 times the amount of fresh herbs as dry.

I have to share two of my favorite ways to use fresh herbs, beyond pizza and bruschetta.

I could eat Italian food, seven days a week, 365 days a year. A hearty red sauce is my favorite. However, every home chef should have at least one classic summertime pesto recipe. Here is one from The Barefoot Contessa herself, Ina Garten. While many know her now from Food Network, I have all of her cookbooks. She is a true icon! http://www.foodnetwork.com/recipes/ina-garten/pesto-recipe.html

Another summertime staple at my house is Herb Butter, which can be made sweet or savory. You can’t go wrong with a lemon thyme herb butter, which is fabulous on pasta, fish or hot, crusty bread. And, it couldn’t be simpler to make, so you’ll spend less time in the kitchen and more time outdoors.

Lemon Thyme Herb Butter

½ cup softened butter

2 tsp. flat leaf parsley (finely chopped)

½ tsp. lemon thyme (finely chopped)

2 tsp. lemon zest

Roll on wax paper into a tube shape. Refrigerate until hardened.  Slice off a round pat when ready to use. Garnish with a thinly sliced lemon half or a sprig of curly parsley.

However you use them, from salads to steaks, I hope you enjoy a summer full of delicious herbs!

Pinterest_•_The_world’s_catalog_of_ideas_-_2016-05-19_13.26.37

For a free download of this darling watering can cross-stitch from Country Living visit http://bit.ly/20bD3Hp.

Smart Perks Blogger, Melanie B., enjoys fresh herbs for their scent as much as their taste!

All uncredited photos taken by Mary Haehn.


20160511_185137_ShopConsignmentStyle

I love, love, love shopping at consignment stores! It’s like going on an expedition only instead of searching for ancient artifacts you’re on a quest to find the best buys on gently-used, quality apparel, shoes, handbags, and jewelry. Sounds exciting, doesn’t it? Well at least it is to shopaholics like me! Imagine getting stylish designer fashions and accessories at a fraction of the original price – a leather Coach wristlet for $18… a casual Calvin Klein tee for less than $10… a silk Jones New York dress for under $20… a pair of embellished Anne Klein flats for around $19… it’s a bargain hunter’s dream!

Over the years I’ve learned to master the art of thrifting, so I thought I’d share a few insider secrets to make your consignment shop excursions a success.

Where to shop. Check local directories or visit sites like TheThriftShopper.com for a listing of stores in your area. Ask savvy thrifters you know for recommendations too.  HINT: I try to hit stores in more affluent neighborhoods as they have a better selection of high-end merchandise.

When to shop. Find out what day of the week stores display new arrivals and try to shop the next day or two to take advantage of the latest deals. Also, check store hours and if you’re going on a Saturday or Sunday, get there early as they tend to be busier late in the morning to mid-afternoon on weekends. If you plan to visit more than one place in a day, you’ll need at least a few hours to browse (it usually takes me four hours or more). In other words, go when you have ample time to shop.

BlogImage_1_Shirts

I tend to go for unique, eye-catching tops likes these. They’re so fun to wear!

How to shop. Keep an open mind. You may be looking for a patterned blouse to match a favorite skirt or a fancy dress for an upcoming event, but you could wind up with a groovy boho tunic or a colorful sundress instead. Take time to sort through the racks ‘cuz you never know what gems you’ll find. Also consider what you already have in your closet and take photos with your camera phone. Then look for pieces to fill out your wardrobe.

Try it on for size. Let’s face it: some things look better on the hanger! Plus, sizes can vary from brand to brand. So, always try on clothes in the store to make sure they fit properly and look flattering on you. Take a walk in those shoes you have your eye on too. The style may be irresistible, but if they’re the least bit uncomfortable, don’t buy them!

 Give it the once-over. Even if stores are meticulous about what they’ll accept, they may overlook a small spot, rip, a broken clasp, or a loose heel. So inspect each item thoroughly. A missing button is no big deal, but unless you’re a magician you may have trouble making a stubborn stain disappear!

BlogImage_3_BabyClothes

I got these adorable, like-new clothes for my granddaughter last month for less than $26!

Kids’ Stuff. Now that I have a sweet little granddaughter, I’ve been frequenting secondhand stores that carry children’s clothes and such. If you’re looking for unbelievable deals on apparel, shoes, hats, baby gear, toys, and other items for infants and toddlers, you’ll find a virtual goldmine in these places. Everything looks practically brand new because most youngsters outgrow everything before they wear out.

Sign up for store mailing lists or follow them on social media. That way you’ll be among the first to know about special sales events. Some stores offer discount coupons to help you save even more.

Another great thing about consignments shops: You can bring in items you no longer want and as long as they’re still in style and in good condition, you could get credit for any sold items. Some places even give you cash upfront!

BlogImage_2_Jewelry

Look at all the fabulous jewelry pieces I found on some of my shopping excursions!

Don’t have any consignment stores nearby? No worries! Just go online and shop at places like these:

ThredUP. Choose from thousands of like-new clothing items for women, girls and boys, all hand-selected and certified for quality. You’ll find popular brands discounted up to 90% off!

The Attic. This site features a huge selection of women’s designer clothing & vintage clothing, accessories, modern & retro jewelry, and more at deep discounts.

Swap.com . Considered the largest online consignment store, Swap.com offers a ginormous selection of pre-owned baby, kids’, maternity, and women’s apparel & accessories.

Happy Shopping!

Smart Perks Blogger Catherine B. can’t wait for her next shopping adventure. Her mission: find some hot deals on cool styles for summer.

Photos by Mary Haehn

Appealing Banana Recipes

BlogShot7

The other day a few co-workers and I were discussing the ideal ripeness of bananas. Some of us like them best when the pulp is a bit firm and the peel is all yellow with green tips. Others prefer to eat them when the banana is a little mushy and the skin is covered with brown specks, which is apparently more flavorful and better for you. One thing we agreed on is how quickly this sweet, delectable fruit can go from bright green and barely ripe to dark brown and slimy.

Our conversation got me thinking about all the bananas I’ve wasted over the years because they were past their prime. Silly me, I could have used them in tasty treats like banana bread, banana bars or banana muffins!

Granted I don’t bake much, but I decided I needed to find ways to salvage overripe bananas (I have a habit of buying a bunch and forgetting to eat them until it’s too late). I’ve included some recipes here and I guarantee you’ll go bananas over them! (Sorry, I had to slip that in there.)

Banana Streusel Muffins (Yields 1 dozen)

BlogShot6

Tweak the recipe a bit to go from Banana Streusel to Banana Nut Muffins!

Ingredients:
1-1/2 cups all-purpose flour
1 tsp. baking soda
1 tsp. baking powder
½ tsp. salt
3 large very ripe bananas, mashed
¾ cup sugar
1 egg, lightly beaten
½ cup butter, melted
Topping:
1/3 cup packed brown sugar
1 tbsp. all-purpose flour
1/8 tsp. ground cinnamon
1 tbsp. cold butter

Directions: Preheat oven to 375ºF.  In a large bowl, combine dry ingredients. In a separate bowl, combine bananas, sugar, egg and butter; mix well. Stir into dry ingredients just until moistened. Fill greased or paper-lined muffin cups three quarters full. Combine the first three topping ingredients; cut in butter until crumbly. Sprinkle over muffins. Bake for 18-20 minutes or until muffins test done with toothpick. Cool pan on for 10 minutes before removing muffins.

Variation: use the same recipe for Banana Nut Muffins only skip the topping and add a half cup of chopped walnuts to the batter before baking.

 Recipe courtesy of Taste of Home

Gluten-Free Banana Bread with Blueberries
A co-worker brought this bread in one day (his wife’s recipe) and if he hadn’t told me beforehand, I never would have guessed it was gluten-free!

BlogShot4

Who knew gluten-free bread could taste so good?

Ingredients
2 cups gluten-free baking flour – click here for a guide to gluten-free flours
1 tsp. baking soda
½ tsp. salt
½ cup butter, softened
1 cup white sugar
2 eggs
2 tbsp. vanilla extract
2 ripe bananas, mashed
1 cup fresh blueberries

Directions: Preheat oven to 350ºF. Grease large loaf pan. In a medium bowl, mix together Flour Blend, baking soda and salt. In a large bowl, beat butter and sugar with an electric mixer until light and fluffy (the color will be lighter too). Add 1 egg and blend with butter mixture before adding the second egg and vanilla extract. Beat mashed bananas thoroughly into the mixture. Add flour mixture in small increments while beating until combined into a thick batter. Fold blueberries into the batter and pour into loaf pan. Bake for 30 to 35 minutes or until a toothpick inserted into the center comes out clean. Let pan sit for 10 minutes before removing bread and cooling on a wire rack.

banana bars

These bars are so moist and delicious they melt in your mouth!

Banana Bars with Cream Cheese Frosting

Ingredients:
1 cup granulated sugar
1 cup mashed very ripe bananas (2 medium)
1/3 cup vegetable oil
2 eggs
1 cup all-purpose flour
1 tsp. baking powder
1/2 tsp. baking soda
1/2 tsp. ground cinnamon
1/4 tsp. salt
Cream Cheese Frosting
1 package cream cheese, softened
1/3 cup butter or margarine, softened
1 tsp. vanilla
2 cups powdered sugar

Directions: Heat oven to 350°F. Grease bottom and sides of rectangular pan, 13x9x2 inches, with shortening. In large bowl, mix granulated sugar, bananas, oil and eggs with spoon. Stir in flour, baking powder, baking soda, cinnamon and salt. Spread in pan. Bake bars 25 to 30 minutes or until toothpick inserted in center comes out clean. Cool completely, about 1 hour. Meanwhile, in medium bowl, mix cream cheese, butter and vanilla with electric mixer on medium speed until blended. Gradually beat in powdered sugar with spoon, scraping bowl occasionally, until smooth and spreadable. Spread cooled bars with Cream Cheese Frosting. Store covered in refrigerator.

Recipe & photo from Bettycrocker.com

Fried Banana & Peanut Butter Sandwich
A favorite of Elvis Presley (and my husband) – it’s like a grilled cheese sandwich only with peanut butter and bananas. Sounds like a weird combo, but it’s actually pretty good!

Ingredients:
2 slices white bread
2 tsp. butter
1 small ripe banana, peeled and sliced
2 tbsp. creamy peanut butter

Directions: Spread peanut butter on one side of bread slice. Top with sliced banana. Cover with other slice of bread and butter both sides. Heat skillet over medium heat and fry the sandwich on each side until golden brown and peanut butter is melted, about 4 minutes.

Check out our Sweet Tooth board on Pinterest for other appealing banana recipes & more!

FINAL NOTE: Instead of tossing the banana peels, save them for composting!

Enjoy!

Smart Perks Blogger Catherine B. loves fresh fruit. She just needs to remind herself to snack on berries, grapes or bananas instead of junk food.

Photos by Mary Haehn.


The Perfect Mother’s Day Meal

spring veggies

Was your mother always begging you to “Eat your vegetables!” like mine was? As a kid, I had no interest. Boiled Brussels sprouts and canned green beans? Blegh, no thank you. But between growing up and developing a more nuanced palate and finding new ways to cook vegetables in the current veggie-centric food world, I’ve become a veggie (and fruit!) fiend.

So mama, this one’s for you – here’s your Mother’s Day menu chockfull of those greens and things that abound in spring.

Though technically spring started in March, let’s get real: if you live anywhere in the northern or eastern states, you’re only now getting to really experience this awesome season. The beautiful greenery, fresh flowers, spring vacations, those warm but not hot days, and my favorite part of spring – the produce!

Asparagus, apricots, artichokes, fava beans, leeks, radishes, rhubarb, peas, carrots…  it truly is the best time of year for a fruit and veggie lover like me.

There are so many different options for how to use the spring crop bounty, but where to begin? It feels like for every time I see a new recipe I’m dying to try, the next day I find three new ones, and then they all just get lost in the bookmarks and I never end up making them!

But fear not. You don’t have to suffer the same sad fate as me, where I’ve followed the instructions to a t only to be left with starchy asparagus or smushy peas. Here is a menu collection of my favorite spring recipes – starting with an appetizer, ending with a dessert – that are as tried and true as can be. You won’t be wasting your precious spring veggies and fruits on disastrous recipes…just the absolute best ones.

Appetizer: Cauliflower-Leek Soup

leek soup

Photo from AllRecipes.com

I like this recipe for two reasons: 1) it switches out starchy potatoes for cauliflower, lowering the carb count, and 2) it’s pretty much as simple as sautéing a few ingredients and tossing them in the blender. Although this recipe calls for a warm soup, I actually have preferred serving it chilled, but both work.

Ingredients:

  • 2 tablespoons olive oil
  • 3 tablespoons butter
  • 3 leeks, cut into 1 inch pieces
  • 1 large head cauliflower, chopped
  • 3 cloves garlic, finely chopped
  • 8 cups vegetable broth
  • salt and freshly ground black pepper to taste
  • 1 cup heavy cream (optional)

Directions:

Heat the olive oil and butter in a large pot over medium heat, and saute the leeks, cauliflower, and garlic for about 10 minutes. Stir in the vegetable broth, and bring the mixture to a boil. Reduce heat, cover, and simmer 45 minutes.

Remove the soup from heat. Blend the soup with an immersion blender or hand mixer. Season with salt and pepper. Mix in the heavy cream, and continue blending until smooth.


Entrée: Crispy Catfish Sandwiches with Quick Cabbage Slaw, Plus Simple Spring Salad

sandwich

Yes, there is a bite taken out of the sandwich. Don’t judge me!

This is a personal recipe I based on a dish I had at a restaurant, and I’ve tweaked it over and over just to my liking. What’s great about it is you could totally substitute another flaky fish if you’d like, or even thin chicken cutlets, and although it is fried, the batter is so light it feels just indulgent enough without being heavy.

Plus, the salad is more than flexible – I’ve swapped radicchio for romaine, fresh French beans for radish, and tried a variety of dressings, though I’m partial to this vinaigrette.

Ingredients:

  • 1-3 whole French baguettes, or individual sub rolls per person depending on size of party
  • 1 catfish fillet per person
  • 1 cup shredded red cabbage
  • 1 lime
  • 2 tablespoons apple cider vinegar
  • 1 tablespoon creamy Dijon mustard
  • ½ cup all-purpose flour
  • 1 teaspoon each cayenne, garlic powder, onion salt, paprika, and cumin
  • 2 hearts of Romaine (or lettuce of your choice)
  • 4-5 thinly sliced radishes
  • Handful of multicolored halved cherry tomatoes
  • Simple lemon vinaigrette dressing
  • Note: will use extra mayonnaise from side dish in this dish

Directions:

Preheat oven to 450 degrees. In a large bowl, mix the flour, 5 tablespoons of water, and half of the spice mixture, plus salt and pepper. In another bowl, mix shredded cabbage, the juice of the lime, the apple cider vinegar and the mustard, stirring well. Then place in fridge. On a dry plate pat the catfish dry. In a nonstick skillet, add just enough olive oil to coat the bottom of the pan on medium heat. Test the temp of the oil by adding a tiny drop of water; if it sizzles, you’re good to go.

Dredge the catfish in the flour mixture, then add to the nonstick skillet. Cook the catfish 4-7 minutes on each side, checking that it’s not burning or sticking but just turning golden brown and crispy. Once cooked, place on clean, paper towel-lined plate, and season with salt and pepper again.

Cut the bread of your choice, and toast in preheated oven gently, just until edges are turning a warm brown. Add the cleaned romaine (or other lettuce), thinly sliced radishes, and the tomatoes to the plate. Drizzle vinaigrette on top; add a grind or two of fresh black pepper. I like to garnish with finely chopped herbs, such as oregano, chives, or basil, but feel free to leave out.

Spread mayonnaise on toasted bread, add catfish fillet, topping with the quick cabbage slaw and serve warm with the side salad.

Side Dish: A Cozy Kitchen’s Roasted Asparagus

Asparagus_2

Photo from A Cozy Kitchen.

This is an easy to make side that truly stuns (if you like asparagus, that is). Here, we’re doubling the recipe for the hazelnut mayo, adding half to the catfish sandwich. Trust me, it works, but if you have nut allergy concerns, just omit the hazelnuts. Also note: she calls for white asparagus, but I made it with only green and it works wonderfully; though she uses an immersion blender, I’ve used a regular blender and everything turned out fine.

Ingredients:

  • 2 whole large eggs
  • *1 cup sunflower or grape seed oil (a clean, mild-tasting oil)
  • *1/4 cup hazelnut oil (optional – if not using, then add 3/4 cup sunflower or grape seed oil)
  • Juice from 1 lemon
  • 4 teaspoon whole grain mustard
  • Salt
  • 3/4 pound green asparagus, washed and ends trimmed
  • 1/4 pound white asparagus, washed, ends trimmed and peeled
  • 2 tablespoons olive oil
  • Juice from 1/2 lemon

Directions:

Preheat oven to 300 degrees. Place hazelnuts on a parchment-lined baking sheet and transfer to the oven to toast for 10 to 15 minutes. Immediately transfer warm hazelnuts to the center of a clean kitchen towel. Wrap the kitchen towel around the hazelnuts and rub them vigorously until all of the skins have fallen off. (A little bit of skin staying on is normal and totally fine.) Set nuts aside to cool.

Meanwhile, add the large eggs, sunflower or grape seed oil, hazelnut oil (if using), juice from lemon, mustard and a few pinches of salt to a tall plastic cylinder (note: most hand immersion blenders come with a tall plastic cylinder for blending). Allow the egg yolk to settle to the bottom. Using a hand immersion blender, stick the blade to the very bottom and blend on high for about 30 seconds; you’ll immediately see the mayonnaise begin to form. Slowly raise the immersion blender near the surface to incorporate all of the oil and until very thick. Salt to taste. In a food processor or using a knife, pulse the hazelnuts until they resemble a coarse meal, about 30 seconds. Add the aioli to the food processor and blend until completely incorporated and smooth(ish).

Preheat the broiler. On a baking sheet (you can use the same one you toasted the hazelnuts on), add the green asparagus in an even layer. Rub the asparagus with the olive oil, lemon juice and a few pinches of salt. Place the baking sheet under the broiler and roast for 5 minutes. At the 5-minute mark, add the white asparagus to the baking sheet. Place the baking sheet back under the broiler and roast for an additional 10 minutes. Serve the asparagus alongside the hazelnut mayonnaise.

Dessert: Smitten Kitchen’s Strawberry Rhubarb Pie

rhubarb pie

Photo from Smitten Kitchen.

You just have to end your meal on a sweet note. I tend to like more delicate little bits and pieces of treats, but my mom is a pie fanatic. This one perfectly walks the line between sweet and tart. Plus, it can be made up to 3 days in advance and left at room temperature, so you don’t have to worry about dessert the day of.

Ingredients:

  • 1 recipe All Butter, Really Flaky Pie Dough or double-crust pie dough of your choice
  • 3 1/2 cups (about 1 1/2 pounds, untrimmed) rhubarb, in 1/2-inch thick slices
  • 3 1/2 cups (about 1 pound) strawberries, hulled and sliced if big, halved if tiny
  • 1/2 cup granulated sugar
  • 1/4 cup light brown sugar
  • 1 tablespoon lemon juice
  • 1/4 teaspoon salt
  • 1/4 cup quick-cooking tapioca
  • 2 tablespoons unsalted butter, cut into small pieces
  • 1 large egg yolk beaten to blend with 1 teaspoon water (for glaze)

Directions:

Preheat oven to 400 degrees. On a well-floured counter, roll half of pie dough into a 12-inch circle and carefully transfer to a 9-inch pie plate. (I like to fold my gently into quarters, to transfer it more easily, then unfold it in the pie plate.)

Stir together rhubarb, strawberries, sugars, lemon, salt and tapioca in a large bowl. Mound filling inside bottom pie crust and dot with bits of unsalted butter. Roll second half of pie dough into an 11-inch circle and cut decorative slits in it. Transfer it to center over the pie filling. Trim top and bottom pie dough so that their overhang beyond the pie plate lip is only 1/2-inch. Tuck rim of dough underneath itself and crimp it decoratively.

Transfer pie to a baking sheet and brush egg yolk mixture over dough. Bake for 20 minutes then reduce temperature to 350 degrees and bake for an additional 25 to 30 minutes, until the pie is golden and the juices bubble visibly.

Transfer pie to wire rack to cool. When full cool (several hours later) the juices gel.

So, just to recap: This menu has cauliflower, leek, cabbage, lettuce, radish, tomatoes, asparagus, lemon, strawberries AND rhubarb. Is that enough veggies (and two fruits!) for you, Mom?

Whether you make this full meal or just some of the recipes, you’re sure to host a home-run Mother’s Day luncheon. Just don’t forget the wine and spritzers!

wine and flowers

Katie U., a Smart Perks employee, wishes all mothers a wonderful Mother’s Day.